Throughout my initial topic, I was able to consistently use appropriate English when describing and paraphrasing records I was able to access online. I have written with the correct English structures of sentences and paragraphs, and using sophisticated vocabulary when appropriate.
Objective 2- My own contribution to my work.
I was able to conduct my own research for the majority of the topic’s work. I was able to re-phrase descriptions online and use my own knowledge where applicable. The only resources that were not mine, were the pictures included in all of the data entries along with the videos I used and referenced within the game level comparison post. I used these as I was able to hand-pick my references and I was able to explain the reasons for my choices, which are displayed under the videos within the blogpage of the existing game level comparisons. I strived to include as much of my own work as possible, to best convey my knowledge with each post. I only resorted to using other forms of data (pictures, videos and definitions) when I knew there was a gap in my current knowledge that needed to be filled by doing external research.
Objective 3- Issues I encountered
Throughout this initial research task, I personally did not undergo any struggles. I was able to swiftly and professionally gather information from numerous websites and compress them into my blogpost. Perhaps the only issue that arose was choosing my information wisely. Due to numerous websites having the same or altered information I found it difficult to cherry-pick the website I would use to supply the information that I needed, so to avoid this in the future, I should check the publisher of the website and the information, and see also, whether the information had been taken from another website (perhaps the original source) and check if any alterations had been made to the information that I need, to ensure it is correct and unaltered.
Objective 4- My time management.
From the start of the research for topic 1, I would personally say that my time management has been outstanding. I was able to research and write up my entire data entry within a day, whilst also ensuring that my data gathered is correct and I have cited the information with accuracy and professionalism. This is particularly evident in the task of comparing pre-existing game levels, where I needed to research and compare 3 levels. Aong with the research about how those levels are created and the steps taken from an idea, to a physical product.
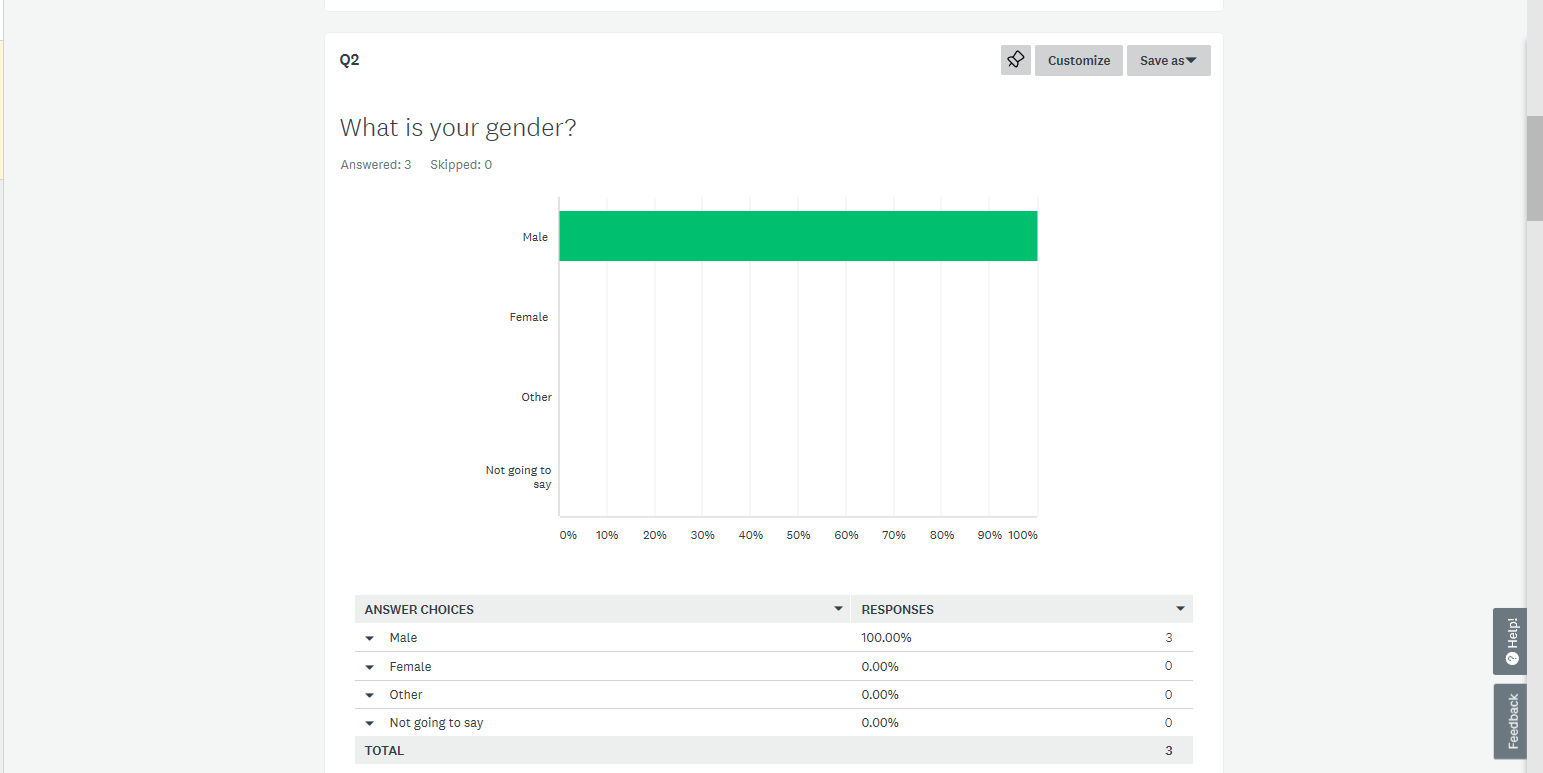
My survey consisted of 10 overall questions ranging from short answers (Yes or No) to longer answers such as “Explain why…” My survey had been posted to the Games Design Facebook group where 3 willing people completed my survey. Underneath are the answers to my questions.
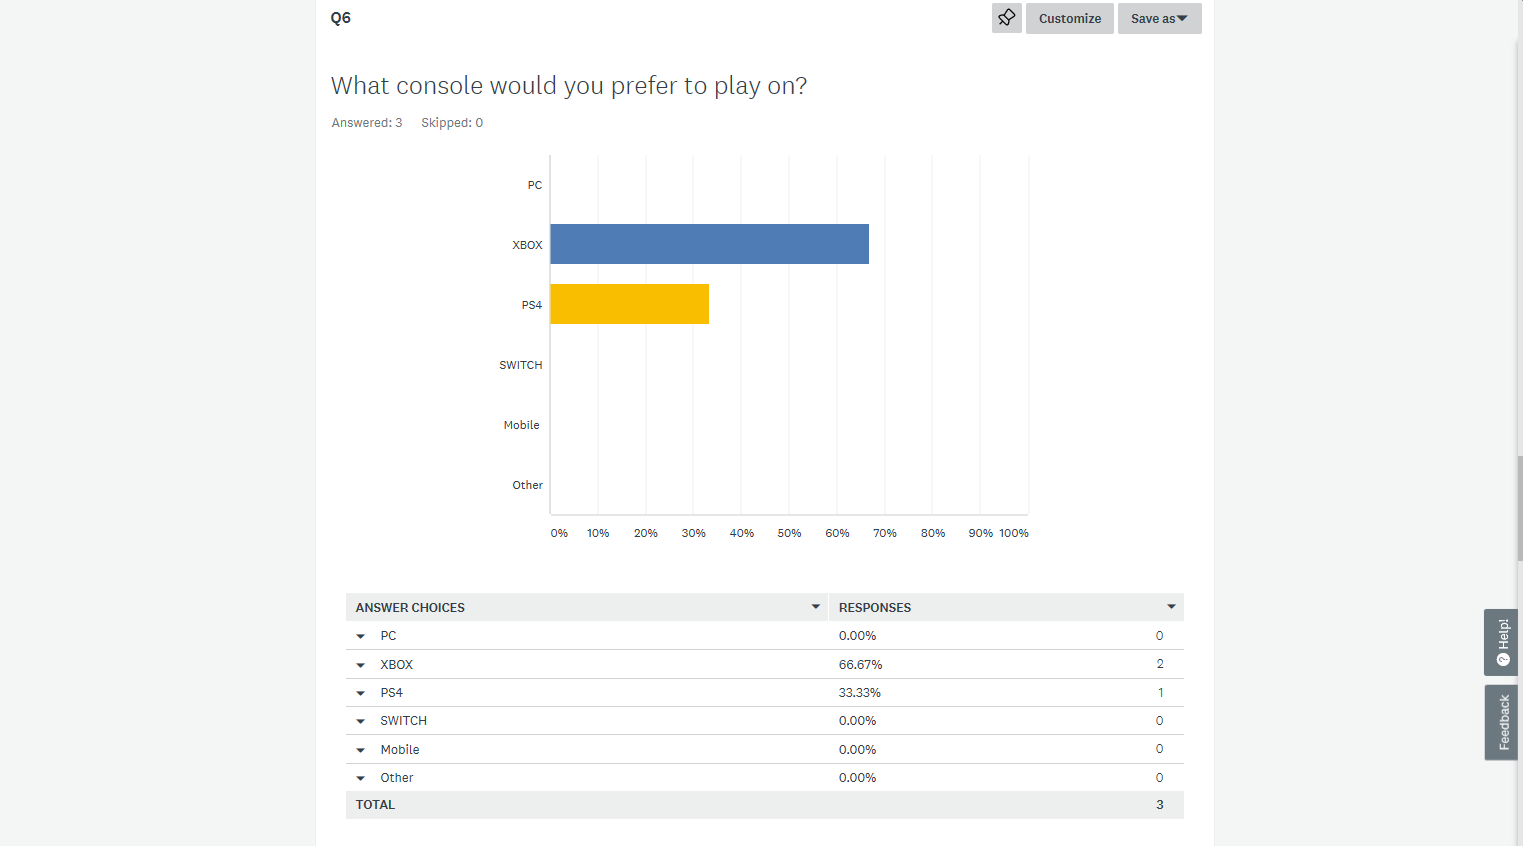
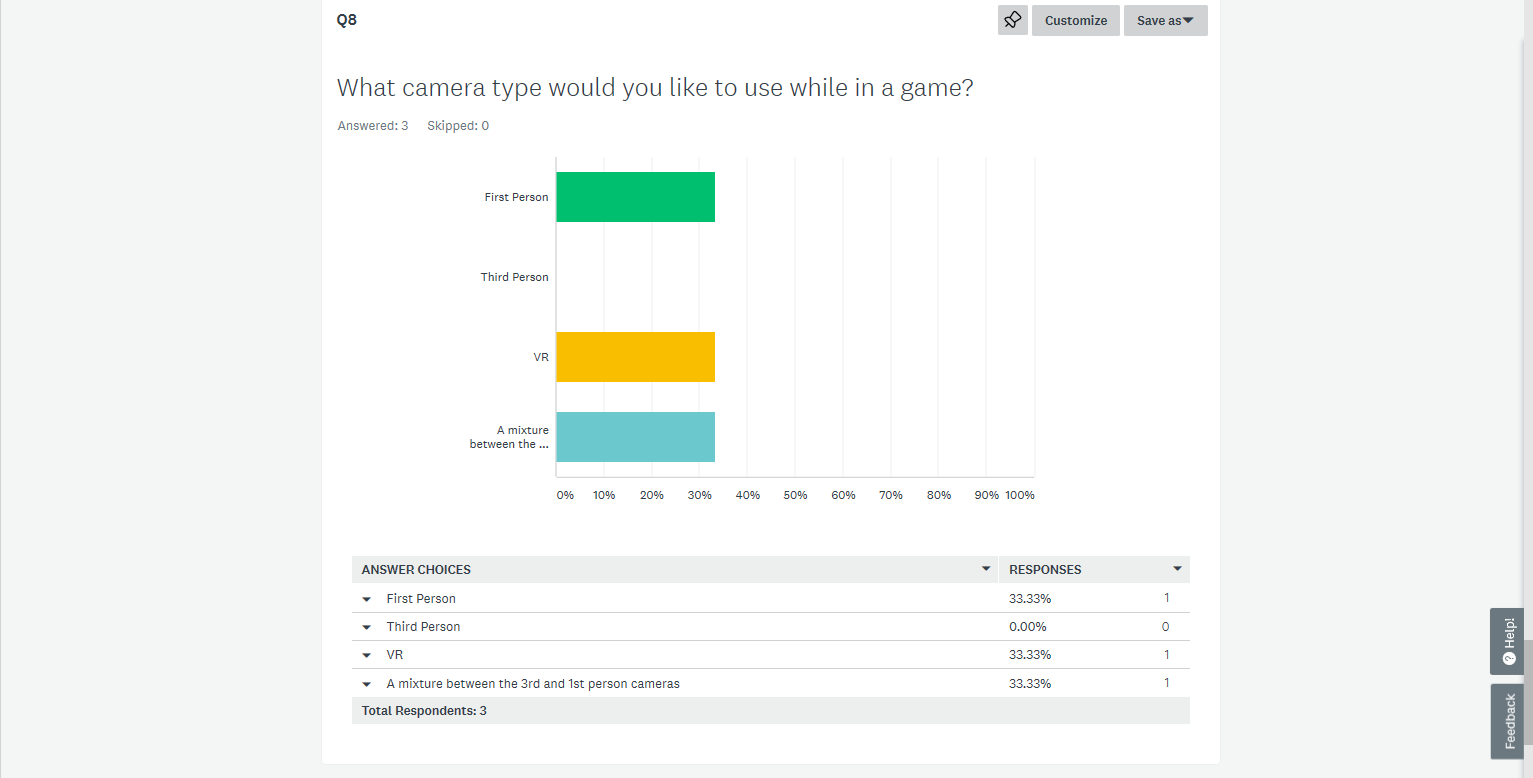
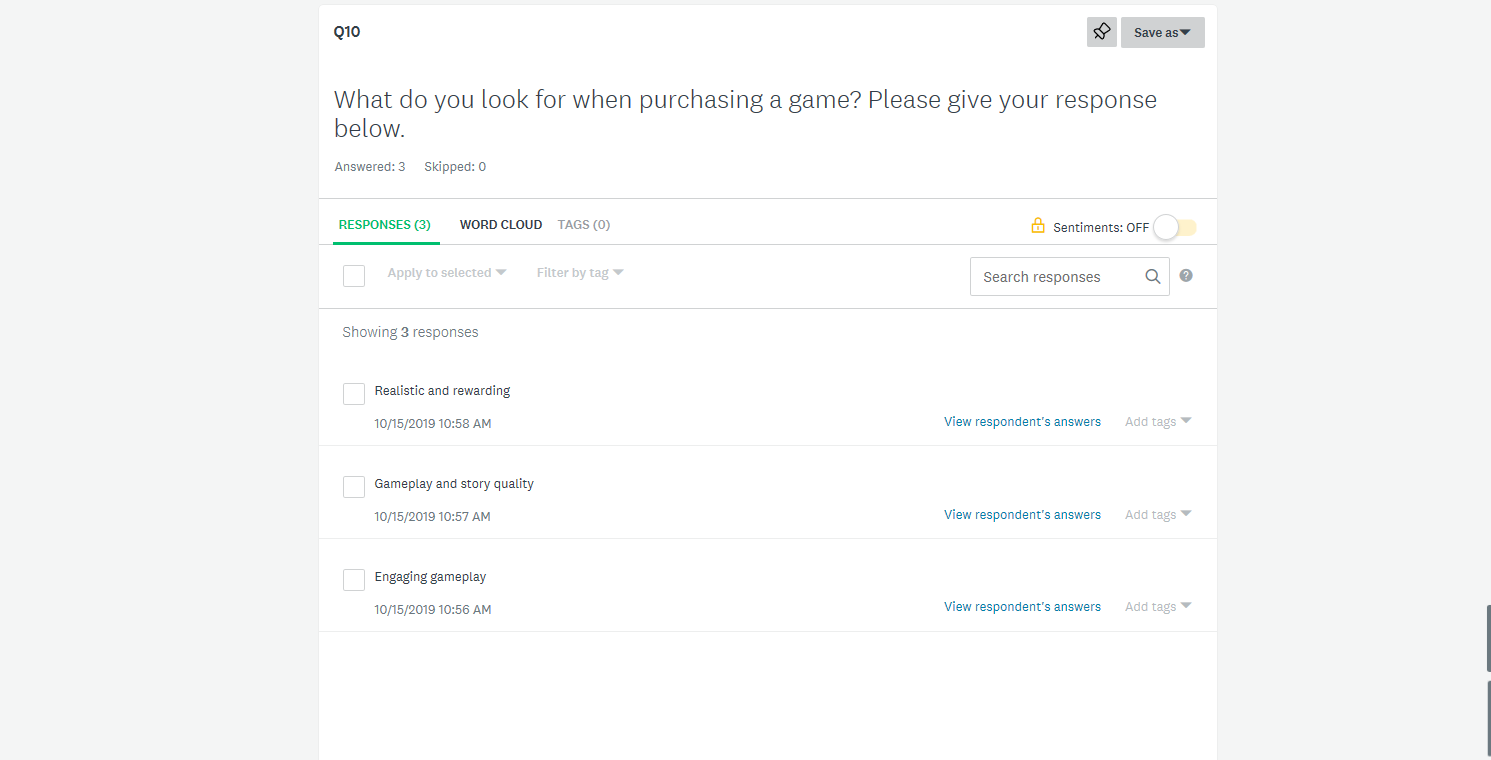
Q1 had a majority of people answer with the age of 16-17, while the lowest amount of answers were 17-18. Here I was able to get a set of data from 2 different age groups. Here all 3 people answered as male.All 3 of my participants played over 10+ hours of video games each week.2 of the 3 participants answered my longer answer question. Sadly one skipped this question, but the other 2 gave their own creative answer in response. Here each of the 3 participants gave their own different answer to the question. One preferred the Aesthetics over Narrative, whilst the other preferred the Narrative over the Aesthetics. Compared to the final participant which remained rather indecisive and so valued both as equal to each other when playing a game.Overall the answers were in the ratio of 2:1 in favour of the Xbox console over PS4, although I am glad to had participants that play on different consoles to answer my questions, to provide some insight on their decisions/answers to the questions.Sadly only 1 of the 3 participants answered this 2nd elongated answer question. Although his answer is valued, I do wish the other 2 spent the extra minute to gave an extended question.Each of the 3 participants gave a different answer, one preferred the 1st person camera angle in a game, while the other preferred a mixture between the 1st and 3rd person. Whilst the final participant opted for the VR option, showing that some people prefer the newer VR camera format over the more standard 3rd and 1st person camera arrangement.Here yet again, all 3 of my participants gave a different answer to the question. One person would always pay for DLC when available, while one other person valued the “battle pass” aspect over the more conventional DLC package. Whilst again, the 3rd person remained rather indecisive and valued both additional content variants equally.For this final extended question, all 3 participants thankfully answered with their own creative answer, giving me an insight into their own opinion.
Overall I got a rather balanced and varied set of answers from my 3 participants. this shows me that at least 1 person enjoys the aspect and future of the VR industry. Whilst the others enjoy their own genre of games.
Hi JOFF, I tried applying all the text into separate text boxes, but it began to lag and it quit many times, ill attach the raw document, and I will try to reapply the texts on Monday.
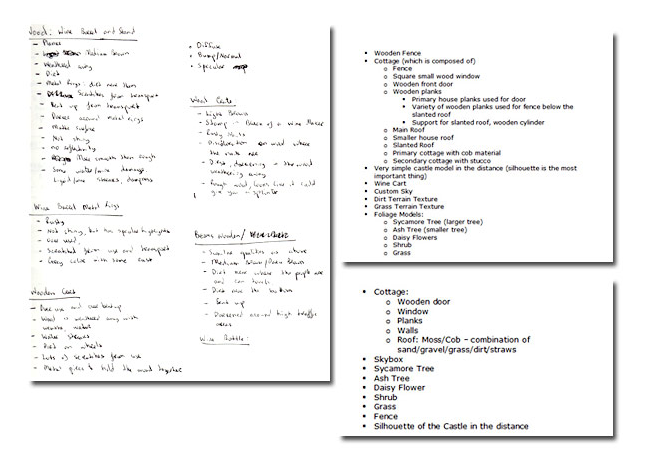
My pack will contain 5 assets that
can be used for this timescale.
My asset pack will include
1.Old military candle lamp
2.Cavalry Sword
3.Old Book
4.Sake bottle
5.Old Train Key
Two antique Leather bound books stacked, the one on top is open. There is a Clipping Path included that will remove the drop shadow.
Problems that I shall face.
Although I have used 3d software
such as Blender, I know my way around adding and modelling shapes within the
software. For no. 1 and 2 the main issue will be finding reference images with
sized labelled. There are pictures of people holding these items, but each hand
is a different size, and it can be rather challenging to gauge the correct
measurements. For the 3 and 5, I would find that baking and texturing would
pose some issues with my current skills. I would have to learn fast and
effective techniques to maximise my time on other sectors, perhaps the
sculpting. Although the hardest would be no. 4. Finding a texture or even
creating my own texture would be rather time-consuming as usually these bottles
have an extensive array of colors and patterns that I could either print flat
onto the mesh, or I could sculpt the shape into the mesh/mould and extrude it
slightly to give them a better and more realistic look and appeal.
Primarily before a level can be designed, the designers must
have an idea of what kind of level they want to be designed. Once the ideas
have been conveyed and agreed to be worked on, the next stage would be the
setting of a location and theme. This would allow for the designers to focus
more solely on a set place, where more focus can be placed on the assets that
would make the setting a replica of the location and overall theme. Once this
has been chosen, a project purpose must be analysed. This is to ensure that all
designers know why they would be taking part in the project, and what this
level would contribute to. E.G. The level would be used in the newest
most popular game series of the studio. Once this has been done, the “set
of features” that the level will include will need to be chosen. These
features are chosen/built upon, to differentiate your level/overall game to the
competition that is also on the market. This can be such features as “a
fully customizable character, a seamless and real-time raid system, and a new
sense of destruction.” These could also be marketing material when
the game releases in the future. Features can be a good set of guidelines that
the level designers should follow, for them to incorporate all the features
into the level. Once these have been chosen and have been able to be
incorporated correctly into the genre of the level, then references will need
to be taken. This is the research aspect which needs to be collected for
reference, as this research will be the starting point when primary sketches
and 3d designs are made when the research has been fully collected. This
research which needs to be collected, can be such research as environment and
location reference which would allow designers to almost replicate or take inspiration
from the location that the level may be trying to replicate. Along with the set
design and prop reference, which would give the designers the research to make
geographically identical/ similar products to the set, and to ensure that
realism is present in the level. Besides that, lighting reference and
style/visual references can be taken. This would allow the designers to take
inspiration again from the lighting present at the location, and that make
appropriate and life-like lighting throughout the level itself and make
appropriate lighting for the assets designed from the photo references. These
will then start the stage of concept art, based on the research. The concepts
will analyse such things as physics and shapes, along with age that would need
to be implemented onto the assets, depending on how long the level occurs after
the year that the assets have been taken from. E.G. Times Square used for
inspiration now, but the level is set in 2120, and so the assets would need to
be aged accordingly, so the user still recognizes that the level is Times
Square, but it has aged significantly, but that’s not all. Alongside this, the
sound team will be starting their work on sounds such as dialogue and sound
effects that will be implemented into the level, such as gunfire or even the
sound of the playable character walking along with ambient noises. This stage
will last as long as to stage 10, where visual development occurs. Once this
has been started, then the Story developers begin/project their story to the
rest of the level design team, and so will begin to express the story, both
explicitly and implicitly. The explicit way of storytelling is told through the
level that the player plays in. This can be through the character/characters
speaking with each other (dialogue), cinematics, and game level objects/assets.
Everything is told/shown directly to the player and so, is the simplest way to
convey a story without any confusion. Compared to implicit storytelling, where
the surroundings and environment tell the story without directly stating what
occurred. (The player must infer based on what they can see around them.) An
example of this can be that the player finds a body lying next to the firearm
on the floor covered in blood. The player was not told that the person shot
himself, but due to no other bodily marks, E.G. bruises, the player can infer
that the person committed suicide and that nobody killed the person while
struggling. Both of these methods of story-telling must be implemented early in
the development stages, as the story writers and the environmental level
designers need to work very closely together, so that the level is appropriate
to the level genre, and that the story can also be told properly and
effectively within the level itself. After this stage. The next step, (step 7)
is to analyse and implement the O-O-S. These are the Objectives, Obstacles and
Set Pieces. The Objectives primarily focuses on what the player will need to
achieve/complete to progress in the playable level, this can gravely vary in
difficulty, from a simple task to one that can be more difficult and
time-consuming. Alongside this, the Obstacles that the player must face are
those that can either take the form of a puzzle, exploration, battles ETC. The
focus of the Obstacles is to add an additional layer of challenges to the level
which in turn adds challenge and elongates the level’s overall playtime.
Finally, the thought and implementation of Set Pieces, otherwise known as
Scripted Events, are the pieces that enable the player to feel immersed within
the game level/world, as this can influence the player’s choice within the
level, and they can see what their actions have to lead to. This allows the
player to feel a sense of belonging within the game’s world/level, and allows
them to make informed choices, as later in the level or game, the player could
be shown how their actions affected the game world, and what consequences arose
from their choices. But besides this, the focal points must also be thought
about and implemented with all prior steps in mind. The next step is to use and
implement the Focal Points. The reason for the use of focal points are as
stated:
Functional purpose – helps the player to orient themselves in
the environment. The player will always know where they are in relationship to
a focal point.
Visual aesthetic function – visual appeal
Helps to draws the player’s attention to a location. It
becomes a point of interest to explore.
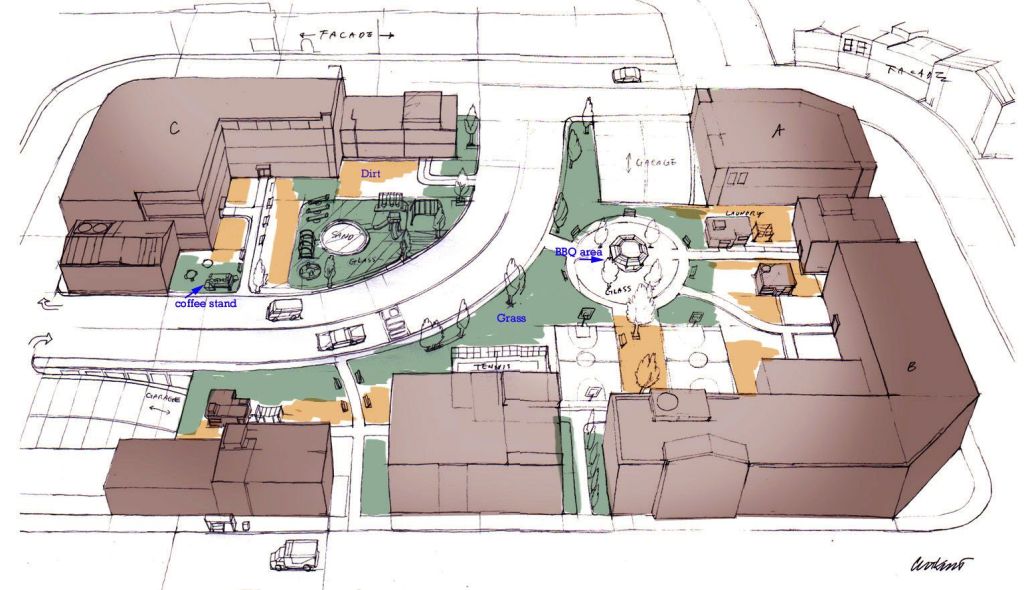
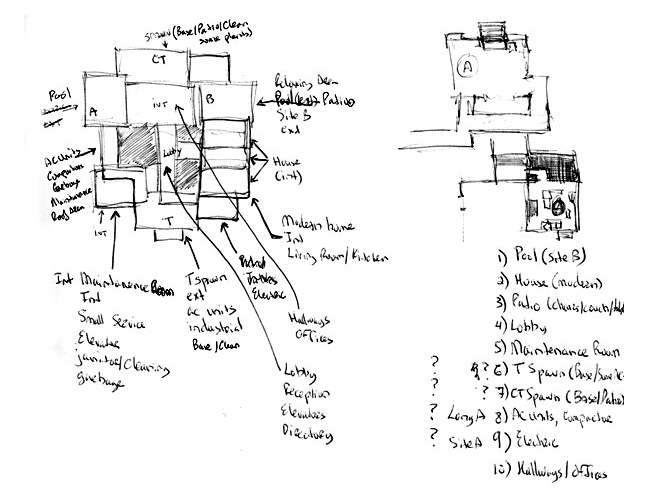
The use of Focal Points allows the player to mostly orient themselves within the map/level, and so gives them an extra sense of exploration that needs to be completed. Whilst also giving them a perspective of the level, whether it be in a town or a field, and gives the player a sense of distance when travelling from one place to the next and allows the player to recollect previous maps/levels by implementing a landmark that differentiates from place to place that they may go. But it does not have to be large or outstanding, something as simple as a single ray of light in a dark room, or even a crashed car within a field, gives the player a sense of direction, based on leaving the car as they walk away, or perhaps looking at the object closer, as it could further the story in the level itself as the landmark could house an interactable object. Yet a designer’s task is still unfinished, the next process would be to create a Top-Down layout, which implements all the previous steps. This layout is a bird’s-eye view of the level that will be created/early concept of the level that will be enhanced later. This can give designers a guide on where to place assets, along with judging the overall size of the level, and can also perhaps start to judge the overall play-time of the level, and so any adjustments to elongate or shorten the playtime can be justified and be made here. Finally, the proper level design and infrastructure can be designed and made. The Visual Development can start to occur with the utmost efficiency, as the designers have all the pieces for the “puzzle” and all that they need to do now is to build it to their standards. Implementing all that they have analysed and read about, ensuring that the level, not just only looks outstanding, but the story flows and all assets and sounds function properly, which will soon lead to a fully playable level. But again, a designer’s work is far from over, they must submit a list/report that entails such items as Asset Lists, Production List and Project Management. {For less of an eyesore please console in the more visual representation seen below.}
Stage 1- Overall idea is thought of and eventually chosen to
be developed as the groundwork for the level. (this can be where the level is
set, (location) or even the initial thought of the story.)
Stage 2- The more in-depth decision of the setting and theme.
This would have been influenced by stage 1.
Stage 3- The project purpose, whether it would be for a new
game company’s NO.1 game, or simply as additional DLC to a pre-existing game,
would change how much time and money would need to be spent on the design and
build of the level.
Stage 4- These are the features that will be implemented into
the level, that set it apart from others in the competition. This could be
pre-existing features that are more refined in this level, or even a new set of
features that are the first of its kind being implemented into the newly
designed level.
Stage 5- This is the collection of references and the
conduction of thorough research. This allows the assets to be designed
according to the research conducted, and so offers the basic planning of assets
and the environment of the level itself to occur.
Stage 6- How the environment tells its story to the player,
this can be in the form of how the level looks at the relevant time of the
player being there, or how it changed from before the layer making an entrance
to it. As stated above, this is the introduction of the explicit and implicit
story-telling that the environment and level convey to the player.
Stage 7- This part is the setting and implementation of O, O
and S. (objectives, obstacles, and set pieces) this allows the designers to
begin to understand the purpose of the level and also allows the designers to
introduce obstacles and puzzles that the player may have to complete in order
to proceed playing in the level. This allows the designers to analyse the
overall playtime that will be needed to complete the level, and from here, they
can shorten or elongate it accordingly.
Stage 8- This is the introduction of focal points. This is
usually in the form of landmarks and allows the player to reorient themselves
in the level and so ensures that the player will be less likely to become lost,
even if the level layout may be complicated.
Stage 9- This is the part where the “Top Down
layout” is drawn. This gives an overhead view of the entire map and shows
such things as boundaries, player paths, alternate routes, spatial
relationships, flow, pacing, cover, player starts, AI position, important
locations, and focal points.
Stage 10- This is the stage where visual development becomes
the focus. Usually, the art style will be determined here, but in a larger
game’s studio, this would have been chosen earlier in development. Concept art
will arise here more and allows changes to made with the characters and even more
minor details in the level if need be.
Stage 11- This is the final step of level design and occurs after each level is made. The developers must create a list of everything in their levels, including assets, production list, and project management. These are titles for more in-depth lists of models, textures, materials, audio, particle effects and any ongoing bugs/errors that need to be fixed and what work will need to be done shortly.
The Design process- (concepts, narrative, characters, mechanics
development)
The overall level design process can be seen above, while I’ll go into
more detail below on the subjects of concepts, narrative, characters, mechanics
and development.
Concepts- These are usually done first, after the initial idea of the
level/game has been chosen. This is the stage where initial designs and ideas
of such items as architecture, character design and even the environment start.
This process although started first, usually isn’t finished first. As this
process can last if even to the alpha build of the game, as assets can be
changed and altered accordingly based on the studio’s own choice or even
pressure from the public.
Narrative- This part usually is started once the initial draft of the
story arc has been devised. This can be speech from the narrator, or even the
characters. This process, once the correct scripts have been made, takes a
while to complete depending on how much spoken dialogue is in the level/game, but
this process can take months to execute perfectly and can even not be completed
by the time of the public beta of the game. (a few months before the game’s
launch)
Characters- This process usually occurs alongside the concept design, as
characters are incorporated into the initial design, then branching to be
focused on later. This can be the most difficult part to execute depending on
the scale of the level/game, and this process usually has the most people
working on it, as the characters are the most visible thing seen to the player,
and so such things as the bodily shape and texture of the characters along with
the outfits and the speech must be the best quality, as they are the forefront
of the level itself, and this is what players will usually see and interact
with the most.
Mechanics- This process is usually completed early in the development of
the level/game, as a level’s mechanics depend heavily on the genre of game.
E.G. a space game would have less/no gravity to simulate being in space. The
mechanics/physics of the level can differ from game to game, but this process
can be created quickly or reused from existing titles that can be reimplemented
and improved on in future titles, an example of this being the Assassin’s Creed
series, where the mechanics are similar from each title, but behave slightly
differently due to improvements being made.
Development- This would be the overall process from the beginning to the end of developing a level/game. The phrase is rather vague as the overall “development” of a level is split into sectors and even those become more sectors, but for some, the development side, can be building on pre-existing items, such as assets, mechanics dialogue etc. Where the initial footwork has been started and the “development/improvement” has commenced. There is not an end to the development process, as it can still be done even when the game has been released, as this process is key to future updates and content that could be released with patches and fixes, to payable DLC. (downloadable content)
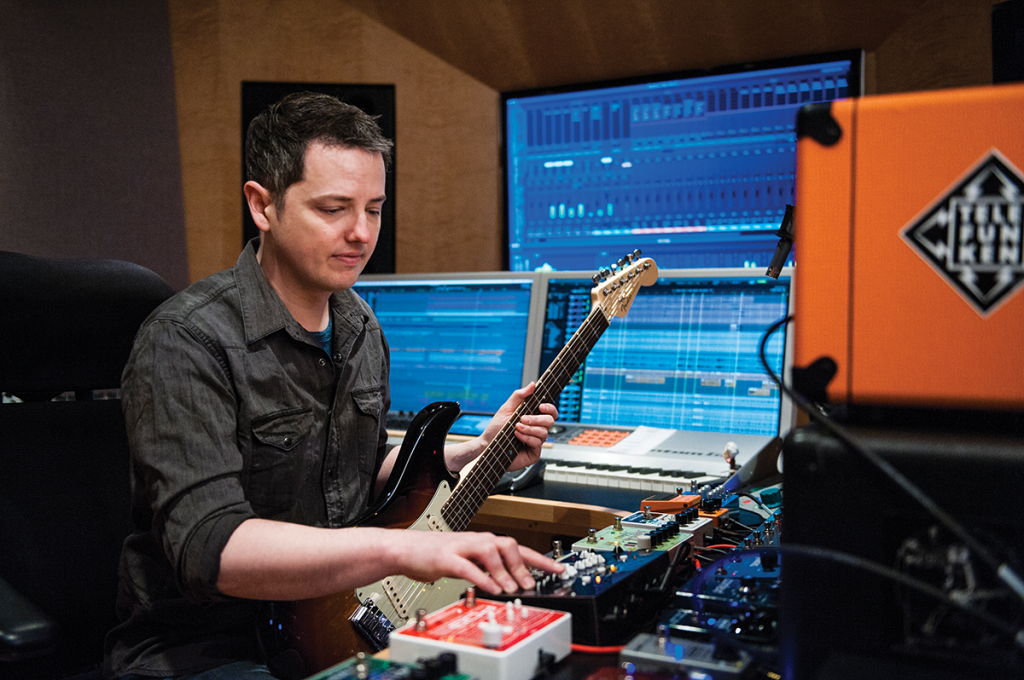
Creating audio within a game, is very similar to creating audio for a movie. Primarily the game clips will be created first, where designers have an idea of what sounds should be incorporated. Then the Foley artists along with the audio mixer, will be given a range of clips where they can add real, non-synthesised sounds to the clips, so it can be added in time with the clip. However, this can be time-consuming and expensive, so some sounds can be artificially synthesised/made which in turn would take a shorter amount of time and so reduce the amount of expenses. This is just for sound effects. Although for a soundtrack, OST, this would usually be done using a live orchestra. This is to ensure that the OST sounds as best as possible giving a premium sound as the level progresses. Once a list of sounds has been chosen to be used the editing process must begin. Usually the studio will use their in-house software, they may use some 3rd party audio editing and trimming software such as Audacity if they do not have their own in-house software.
Software
used-
Modelling:
Maya
3DS Max
Sculpting:
Zbrush
Mudbox
Texturing/Materials:
Quixel Suite
Substance Painter
Photoshop
Game engines:
In house engines (made by the company
developing the game)
CryEngine
Frostbite
Unreal Engine
Source
Unity
Snowdrop
(Although
all departments need different software to accommodate to their specialty, some
software will be shared between departments and so software will be used
throughout.) In terms of what order the modelling, texturing and sculpting
occurs, primarily the modelling occurs first. As this action interacts with the
mesh itself and alters the shape creating the digital canvas which will place
the work of sculpting later. The next stage would be sculpting. This is the part
of the process where the designer will add detail and alter final shapes within
the initially designed mesh, this can be such detail as adding muscle
definition or even adding scars. But the main purpose of sculpting is to add
brushed detail easily, without using too many meshes, which would lead to the
asset being hard to implement into such engines as Unity or Unreal, as the poly
count would be too high for the engine or the PC/console to handle. Once this
has been completed, the final step is to add textures to the asset to ensure
that it looks realistic, and that it matches with the levels time setting and
genre. For example, a designer could make a teddy bear with an eye missing look
like a normal teddy, with a nice brown fluffy texture. But change the texture
to black and add blood patches, and the bear would now fit into a horror game.
This goes to show that the asset can be initially be designed for one purpose,
but the texture applied to it, can give it many purposes and can be used across
many game genres.
As
mentioned above how different departments need different software, different
departments need different hardware that can primarily run the software along
with doing other hardware such as drawing tablets that can draw
pictures/concept art straight into the software. While the sector that probably
would need the most powerful PC would be the sector that deals with the test
gameplay and video editing, that would be done to create the game trailer. This
is to make the game look as good as possible (highest resolution) and also as
high a framerate as possible. Depending on the studio, whether it be an indie
studio or a AAA studio, their spending would differ on their hardware. Verified
sources for the hardware used in a game studio, can be hard to find, so it can
only be left to speculation, or even asking a game studio employee. Besides the
design aspects of level design, the in-house testers need such hardware as
controllers (usually the ones that the game will release onto, e.g. Xbox
controller and PS4 controller) but this would depend on the studio. If the
studio made video games for consoles. PC and mobile, then they would need all
the consoles on-hand to use as the game/levels are created to ensure compatibility
along with ensuring that no errors are found.
Required
assets- The assets that I will need, will be a mixture of being created my
myself, along with using some from the Engine’s assets store. Such assets would
be buildings and nature, clothes, furniture and even a skybox. I could create
most of these myself, but I would rather give myself more time to use on
scripting and planning.
Mechanics-
I would need to choose how my level operates and how the player operates within
that. I could try to replicate pre-existing mechanics or even use them, or I
could plan and write my won scripts to introduce mechanics that could be solely
in my level. How the character interacts with the environment will be crucial
for the overall playability and so must be given lots of time in order to be
executed properly.
Audio- + recording hardware I will try to make most of the audio in my level myself. This would challenge me as I have never done this before and would mean that I would need to conduct research beforehand and then incorporate what I learned into my level. Some sounds like gunshots or explosions I could artificially replicate, but I would prefer to make each sound heard, as real as possible, even if it means using sounds from the asset store. The hardware that I would use would be a good microphone that can record the audio being recorded, and perhaps a music mixer, that I could use to compile sounds/tunes to create a general basis for an OST, but I would prefer to make an OST within such programs as Audacity. Whilst incorporating audio into the Engine/game is also very simple, for example, addding background music to a menu screen is as simple as dragging the MP3 file into the audio file and again drag the MP3 onto an object in the menu, and it will play by itself and it can be looped if need be.
Software-
Each process will require different software, at this current time, I would use
such software as,
Unity,
Cry-engine, Blender, Maya, Audacity, Word Photoshop and Quixel.
Not
all the software is free, and some operate on a monthly subscription. The
software would allow me to venture through the entire process of level design
ranging from, the initial drafts and texts, to the mesh creations and texturing
later and finally compiling all if the assets into the game engine to be tested
and modified accordingly.
Game
engines- For the game engine, I would either choose the Unity engine or the CryEngine.
Both are formidable and offer rather similar tools to use and can offer almost
the same results in terms of performance. I primarily would choose Unity as I
have spent longer using the engine, but I would like to learn to use the CryEngine
as it offers some tools that unity does not in its current build.
2d/3d
content creation- Content creation will take a long time for me, as I’m not
very familiar with Maya, and my current PC cannot run such software as Blender
anymore. Although the 3D creation for my level would include asset creation and
perhaps even architecture, along with some assets for the wilderness, that I
can change to make the backdrop look more realistic, or even photorealistic.
This process would be the most difficult for me, as I would usually spend too
long on creating a certain asset that I would use once, when I could have spent
my time more wisely. To fix this, I could watch tutorials on creating certain
assets for my level, as this would make the process quicker, whilst I also
learn how to use different tools to further speed up my work.
Textures-
This workload, I would need to do research for, such as reading blog posts and
watching tutorials, as I am not familiar with creating a texture along with
applying it to an object. This would be my weak point as I have never done
texturing before, and so this would take the longest to master and start doing
more occasionally and comfortably.
Narrative-
Although I do not have any experience with adding sounds to levels, I could
either pay somebody to read/voice act for me, or even ask a family member to
read. The difficult part would be editing and compiling the audio reel to the
visuals on screen and keep everything in sync. I would probably use audio
software like Audacity as it is easy to use, and I have some experience using
it.
Research-
The research I would need to conduct would not only be for guidance when using
software, but also for reference images when designing/modelling assets. This
would allow me to ensure that the assets do look realistic and that I have the
skills to make them look like this. This process would be slower than usual,
but this is due to learning alongside designing the asset, which the skills that
I would gain, would allow me to use them more efficiently further down the
line. Alongside this, I would need to research such things as clothes of the
era along with the environment of Japan in that era. This would contribute to
the asset creation and allow me to even make my own replicas of items from that
era.
Planning/design
work- I would conduct my designs by using Adobe Photoshop. It has a great host
of tools and can be easily learnt if need be. I do not have any experience with
Photoshop, so I would need to read some books and watch some tutorials on how
to use Photoshop most effectively for the design process. The initial planning
that would also need to be done, could be completed using Word or even PowerPoint,
to convey the processes that I went through to then decide what to plan for my
final level.
Scripts- For scripts I would use Visual Studio,
as it is compatible with most game engines such as Unity. It can be used for
different programming languages and so I can use this to my advantage. Having
learnt a little Python, I could incorporate this knowledge, but I would prefer
to stick with C# as I have learnt more of it. Along with this, I could research
ands watch tutorials on the process of adding scripts to assets, and this would
broaden my scripting/coding knowledge and so I would then use what I learnt for
such projects as my Final Major Project.
Primarily before a level can be designed, the designers must
have an idea of what kind of level they want to be designed. Once the ideas
have been conveyed and agreed to be worked on, the next stage would be the
setting of a location and theme. This would allow for the designers to focus
more solely on a set place, where more focus can be placed on the assets that
would make the setting a replica of the location and overall theme. Once this
has been chosen, a project purpose has to be analyzed. This is to ensure that
all designers know why they would be taking part in the project, and what this
level would contribute to. E.G. The
level would be used in the newest most popular game series of the studio. Once
this has been done, the “set of features” that the level will include
will need to be chosen. These features are chosen/built upon, to differentiate
your level/overall game to the competition that is also on the market. This can
be such features as “a fully customizable character, a seamless and real-time
raid system, and a new sense of destruction.” These could also be marketing material when
the game releases in the future. Features can be a good set of guidelines that
the level designers should follow, for them to incorporate all the features into
the level. Once these have been chosen and have been able to be incorporated
correctly into the genre of the level, then references will need to be taken.
This is the research aspect which needs to be collected for reference, as this
research will be the starting point when primary sketches and 3d designs are
made when the research has been fully collected. This research which needs to
be collected, can be such research as environment and location reference which
would allow designers to almost replicate or take inspiration from the location
that the level may be trying to replicate. Along with the set design and prop
reference, which would give the designers the research to make geographically
identical/ similar products to the set, and to ensure that realism is present
in the level. Besides that, lighting
reference and style/visual references can be taken. This would allow the
designers to take inspiration again from the lighting present at the location,
and that make appropriate and life-like lighting throughout the level itself
and make appropriate lighting for the assets designed from the photo references.
These will then start the stage of concept art, based on the research. The
concepts will analyze such things as physics and shapes, along with age that
would need to be implemented onto the assets, depending on how long the level
occurs after the year that the assets have been taken from. E.G. Times Square
used for inspiration now, but the level is set in 2120, and so the assets would
need to be aged accordingly, so the user still recognizes that the level is Times
Square, but it has aged significantly, but that’s not all. Alongside this, the
sound team will be starting their work on sounds such as dialogue and sound
effects that will be implemented into the level, such as gunfire or even the
sound of the playable character walking along with ambient noises. This stage
will last as long as to stage 10, where visual development occurs. Once this
has been started, then the Story developers begin/project their story to the rest
of the level design team, and so will begin to express the story, both
explicitly and implicitly. The explicit way of storytelling is told through the
level that the player plays in. This can be through the character/characters
speaking with each other (dialogue), cinematics, and game level objects/assets.
Everything is told/shown directly to the player and so, is the simplest way to
convey a story without any confusion. Compared to implicit storytelling, where
the surroundings and environment tell the story without directly stating what
occurred. (The player must infer based on what they can see around them.) An
example of this can be that the player finds a body lying next to the firearm
on the floor covered in blood. The player was not told that the person shot himself,
but due to no other bodily marks, E.G. bruises, the player can infer that the
person committed suicide and that nobody killed the person while struggling.
Both of these methods of story-telling must be implemented early in the
development stages, as the story writers and the environmental level designers
need to work very closely together, so that the level is appropriate to the
level genre, and that the story can also be told properly and effectively
within the level itself. After this stage. The next step, (step 7) is to
analyze and implement the O-O-S. These are the Objectives, Obstacles and Set
Pieces. The Objectives primarily focuses on what the player will need to
achieve/complete to progress in the playable level, this can gravely vary in
difficulty, from a simple task to one that can be more difficult and
time-consuming. Alongside this, the Obstacles that the player must face are
those that can either take the form of a puzzle, exploration, battles ETC. The
focus of the Obstacles is to add an additional layer of challenges to the level
which in turn adds challenge and elongates the level’s overall playtime.
Finally, the thought and implementation of Set Pieces, otherwise known as
Scripted Events, are the pieces that enable the player to feel immersed within
the game level/world, as this can influence the player’s choice within the
level, and they can see what their actions have to lead to. This allows the
player to feel a sense of belonging within the game’s world/level, and allows
them to make informed choices, as later in the level or game, the player could
be shown how their actions affected the game world, and what consequences arose
from their choices. But besides this, the focal points must also be thought
about and implemented with all prior steps in mind. The next step is to use and
implement the Focal Points. The reason for the use of focal points are as
stated:
Functional purpose – helps the player to orient themselves
in the environment. The player will always know where they are in relationship
to a focal point.
Visual aesthetic function – visual appeal
Helps to draws the player’s attention to a location. It
becomes a point of interest to explore.
The use of Focal Points allows the player to mostly orient
themselves within the map/level, and so gives them an extra sense of
exploration that needs to be completed. Whilst also giving them a perspective
of the level, whether it be in a town or a field, and gives the player a sense
of distance when travelling from one place to the next and allows the player to
recollect previous maps/levels by implementing a landmark that differentiates
from place to place that they may go. But it does not have to be large or
outstanding, something as simple as a single ray of light in a dark room, or
even a crashed car within a field, gives the player a sense of direction, based
on leaving the car as they walk away, or perhaps looking at the object closer,
as it could further the story in the level itself as the landmark could house
an interactable object. Yet a designer’s task is still unfinished, the next
process would be to create a Top-Down layout, which implements all the previous
steps. This layout is a bird’s-eye view of the level that will be created/early
concept of the level that will be enhanced later. This can give designers a
guide on where to place assets, along with judging the overall size of the
level, and can also perhaps start to judge the overall play-time of the level,
and so any adjustments to elongate or shorten the playtime can be justified and
be made here. Finally, the proper level design and infrastructure can be
designed and made. The Visual Development can start to occur with the utmost
efficiency, as the designers have all the pieces for the “puzzle” and
all that they need to do now is to build it to their standards. Implementing
all that they have analyzed and read about, ensuring that the level, not just
only looks outstanding, but the story flows and all assets and sounds function
properly, which will soon lead to a fully playable level. But again, a
designer’s work is far from over, they must submit a list/report that entails
such items as Asset Lists, Production List and Project Management. {For less of
an eyesore please console in the more visual representation seen below.}
Timeline-
Stage 1- Overall idea is thought of and eventually chosen to
be developed as the groundwork for the level. (this can be where the level is
set, (location) or even the initial thought of the story.)
Stage 2- The more in-depth decision of the setting and
theme. This would have been influenced by stage 1.
Stage 3- The project purpose, whether it would be for a new
game company’s NO.1 game, or simply as additional DLC to a pre-existing game,
would change how much time and money would need to be spent on the design and
build of the level.
Stage 4- These are the features that will be implemented
into the level, that set it apart from others in the competition. This could be
pre-existing features that are more refined in this level, or even a new set of
features that are the first of its kind being implemented into the newly
designed level.
Stage 5- This is the collection of references and the
conduction of thorough research. This allows the assets to be designed
according to the research conducted, and so offers the basic planning of assets
and the environment of the level itself to occur.
Stage 6- How the environment tells its story to the player,
this can be in the form of how the level looks at the relevant time of the
player being there, or how it changed from before the layer making an entrance
to it. As stated above, this is the introduction of the explicit and implicit
story-telling that the environment and level convey to the player.
Stage 7- This part is the setting and implementation of O, O
and S. (objectives, obstacles, and set pieces) this allows the designers to
begin to understand the purpose of the level and also allows the designers to
introduce obstacles and puzzles that the player may have to complete in order
to proceed playing in the level. This allows the designers to analyze the
overall playtime that will be needed to complete the level, and from here, they
can shorten or elongate it accordingly.
Stage 8- This is the introduction of focal points. This is
usually in the form of landmarks and allows the player to reorient themselves
in the level and so ensures that the player will be less likely to become lost,
even if the level layout may be complicated.
Stage 9- This is the part where the “Top Down
layout” is drawn. This gives an overhead view of the entire map and shows
such things as boundaries, player paths, alternate routes, spatial
relationships, flow, pacing, cover, player starts, AI position, important
locations, and focal points.
Stage 10- This is the stage where visual development becomes
the focus. Usually, the art style will be determined here, but in a larger
game’s studio, this would have been chosen earlier in development. Concept art
will arise here more and allows changes to made with the characters and even
more minor details in the level if need be.
Stage 11- This is the final step of level design and occurs
after each level is made. The developers must create a list of everything in
their levels, including assets, production list, and project management. These
are titles for more in-depth lists of models, textures, materials, audio,
particle effects and any ongoing bugs/errors that need to be fixed and what
work will need to be done shortly.
How I’ll Apply this to my level- For both my final project
at the end of year 1 and also my Final major project for the end of year 2, I
will be following each of these 11 steps that I have explained. Although it may
not be in the same degree of detail that a fully-fledged game studio can
accomplish, I shall look at pre-made applications of development, and I shall
try to replicate their degree of detail, which may take longer to accomplish.
Although along with this I shall include reference images for each stage and
attach them to the blog site, under Final project, which will be launching very
soon.
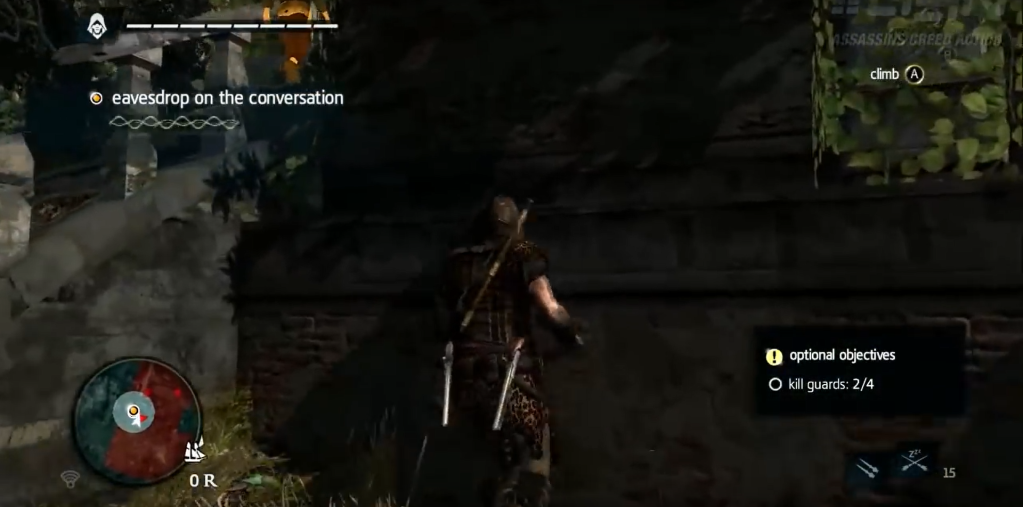
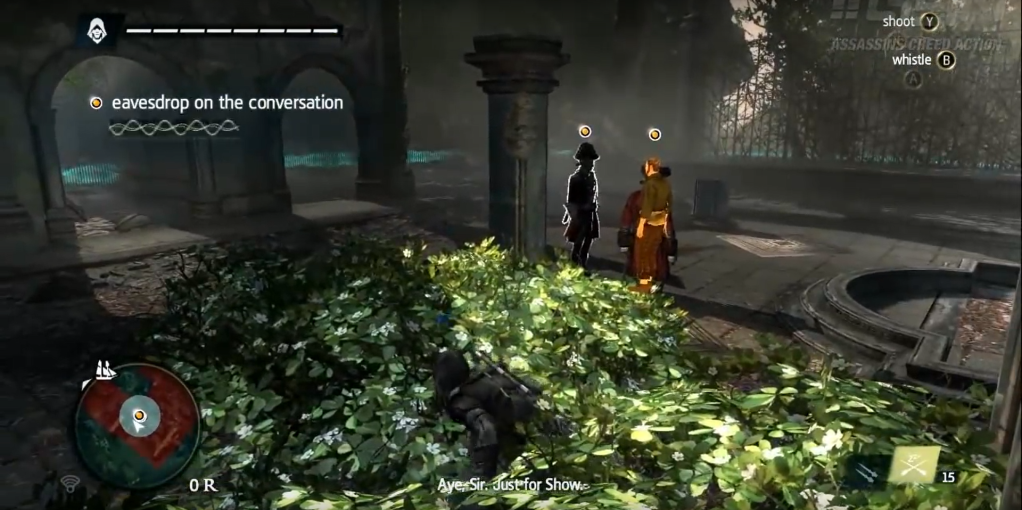
In this level you (Edward Kenway) and Blackbeard (Thatch) are celebrating his retirement from piracy. You spot a rather paranoid fellow who stares at both you and Thatch, who turns out to be a solider spying on you and Blackbeard, and so proceed to follow him deeper into the jungle. You have to “eavesdrop” on his conversation with another officer, ensuring to stay hidden in present bushes that are loitered on the path that the officer and spy take. The spy then signals a flare that calls in a barrage of cannon fire and a large British ship (Man O’ War) to your position. From here, the island is engulfed in flames, although a fire-free path has been made for you. Your minimap indicates that you have to reach your ship, the “Jackdaw” and attack the ship alongside Blackbeard. On the brink of sinking, you must board the British vessel and fight the sailors aboard. Upon fighting these sailors, you see Blackbeard become overwhelmed by the enemy sailors and watch him die, after being shot and then stabbed. You then get pushed of the starboard side of the Man O’ War and have to then return to the Jackdaw within a 30 second time frame. This imposes a time-based challenge, along with my personal view, that with a short time frame, there is no time to mourn over Thatch, as you must sail to the open seas to avoid detection.
This is the start of the eavesdrop, following the spy through the ruined building/hideout.
Assets-
This Mission is set mostly within the forest/jungle,
along with aboard the Jackdaw. There are quite large assets present while
“eavesdropping” on the spy, such as a ruin of a house/manor along with large
trees which are interactable and allow you to hide behind, although I would not
suggest it. The lighting is rather dim and dark, besides patches of light,
which then brightens later. The light brightens once the conversation is coming
to an end, almost signifying that the heavens have opened for Thatch’s time to
go. Although from a distance the environment looks amazing, even for an older
title, I do have issues that when I look closely at trees or walls that
surround such areas like the building that you follow the conversation through,
some textures were lacking in detail, but it did not affect gameplay in anyway.
Scattered around the map in which you follow your spy, are enemy soldiers with Ai, that tracks you if you are seen lurking around. This adds another level of skill and prevents the player from completing the level too easily. The soldiers do spot you when you are not sneaking around, and so chase after you with a sword, and so the mission then ends when you are spotted. This mechanic does promote orderly game play, and adds a rough time structure to the mission, to ensure that it is not too short and rushed.
When it comes to sounds though. This level executes it perfectly, as the sounds do indeed sound rather realistic and do offer a sense of realism when playing. Saying that the game will soon be 7 years old, the Anvil engine did exceptionally well in compiling the sounds and ensuring that they sounded proper, depending on where the player was walking. Accompanying the array of sounds was the OST. I personally found that it matched well with the scene and mission at hand, it was a subtle track that was played in the background, and thankfully it did not get louder during key parts of the mission. It did get more intense though, once the fighting started between the Jackdaw and the Man O’ War, but this is to be expected, as it puts the player in a more aware sense of mind compared to earlier. I prefer this over getting louder, as I start to lose myself in the OST rather than focus on the mission, which can lead me to failing the mission entirely, along with changes in the OST during certain times of the mission, to show that the overall feel of the level has changed, just like the emotions of the player (Kenway) and the new task that needs to be completed.
Playability/complexity-
The level in my opinion, flowed rather well, making it rather simple and easy to grasp what needed to be done and why. With little hints being shown on what you needed to do. Since there were many paths that the player could take when following the spy, this level offered a little freedom in terms of movement and the routes available to take, while still forcing some ground rules, like keeping a set distance from the target, as getting too close would mean that you would become “spotted” and the mission would restart again, from the last checkpoint. Although like most RPGs, the missions are mostly made to be played once, and never touched again. This is due to the main focus of the mission is to provide character development and progress the story further. Plus, with the mission taking roughly 12 minutes, the replay ability factor is not this level’s priority. Although the controls can take some time to get acquainted with, but by this mission anyways, the player should have a reasonable understanding of which swords do most damage and have probably already chosen a favourite. So, combat at this level should not be difficult, it all just depends on timing. As from what I watched, and from experience, both the player in the video and I had issues with deflections from other soldiers. Yet overall, the complexity is not enough to confuse a player, and if the player knows the controls, then the complexity should not impact the playability too much, and keep the player entertained and satisfied with the scale of combat provided
Aesthetics- The aesthetics did capture the Caribbean in true detail. Especially the scenery. Such details as the ruined building along with the palm trees, along with the shaping of the docks later on with the huts on top, did incorporate a sense of the era of the 1700s and did not feel out of place at all. Although the ending cinematic, where indeed the death of Thatch does occur, was indeed aesthetically pleasing. From the weather appearing partially cloudy, and the way the ship rocked, to how when Thatch got cut, some blood splattered onto the screen/cinematic camera, to show a sense of realism within the game level itself, along with showing that Thatch was indeed gone and even the slow motion capture of his body falling to the deck, did show a sense of time stopping, as his friend Kenway could only sit and watch, before being tossed overboard which again covered the cinematic camera in a fine mist to show that Kenway has hit the water and adds that extra level of involvement and detail to the level as it begins to come to a close. Although when the global release of the game had been done, consumers quickly realised that downgrades in graphics that had occured. This was rather disappointing to the player base and Ubisoft was asked why this occurred. They still haven’t given a proper answer why. So I would fix the texture issues present, by allowing the game to be made and sold like how the trailer and demo depicted it to be.
These are the huts that you must run through when the canon ball artillery comes.This added detail of blood, gives the sense of death to the player, and ensures that in fact Thatch has actually been struck, which intensifies the death scene. This added detail of eater shows to the player that Kenway/you have fallen into the ocean and not onto a vessel, showing that the storey must progress, and that there is little time to focus on the past. and so you must keep moving.The aesthetics here, show that the building is in ruins, and that the scenery does show a sense of ruin and does fit well within the time setting of the 1700s. (1719 to be exact)
(All pictures gathered above, are from one source. A YouTube video published by Assassin’s Creed Series, which I visited at 1:11pm on the 20/09/19. I chose this source, as it offered uninterrupted gameplay and I was able to capture the entirety of the level during the gameplay, whilst also including the ending cinematic that is also uninterrupted and in an excellent viewing quality.)
In the gallery above, the right shows the Demo of the level shown at E3. Whilst the left shows the retail gameplay. Overall, Ubisoft had to decrease the detail and lower the aesthetics of the entire game, due to timing issues along with the console at the time (Xbox one/PS4) could not have run the game as they would have liked, so downgrades had to be made. (The pictures gathered in the gallery above are taken from a YouTube video from Cycu1, visited 20/09/19 at 1:30pm. I chose this reference, as the video had an excellent and well-timed side-by-side of the trailer and retail gameplay. Allowing for easy comparisons to be made, while along with this, the video was in excellent quality allowing for good snapshots to be taken.
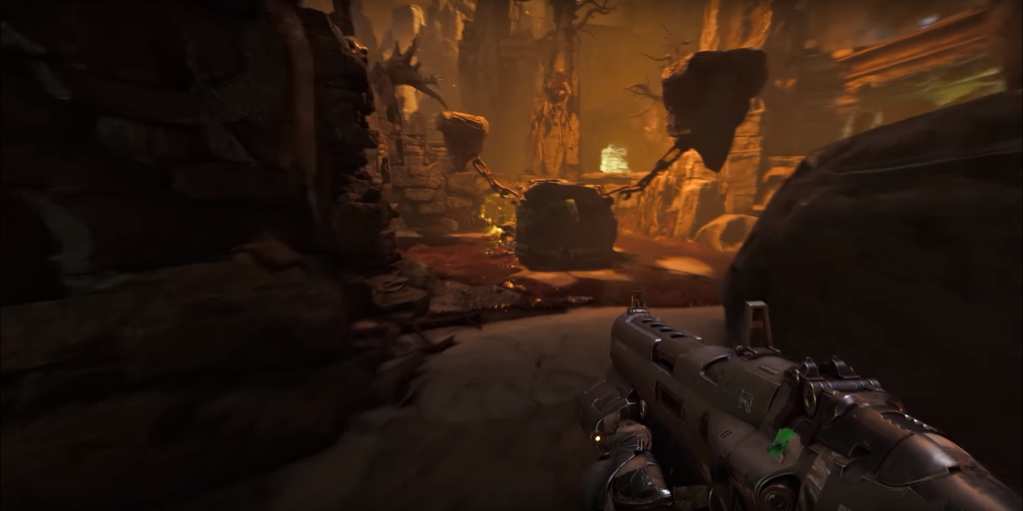
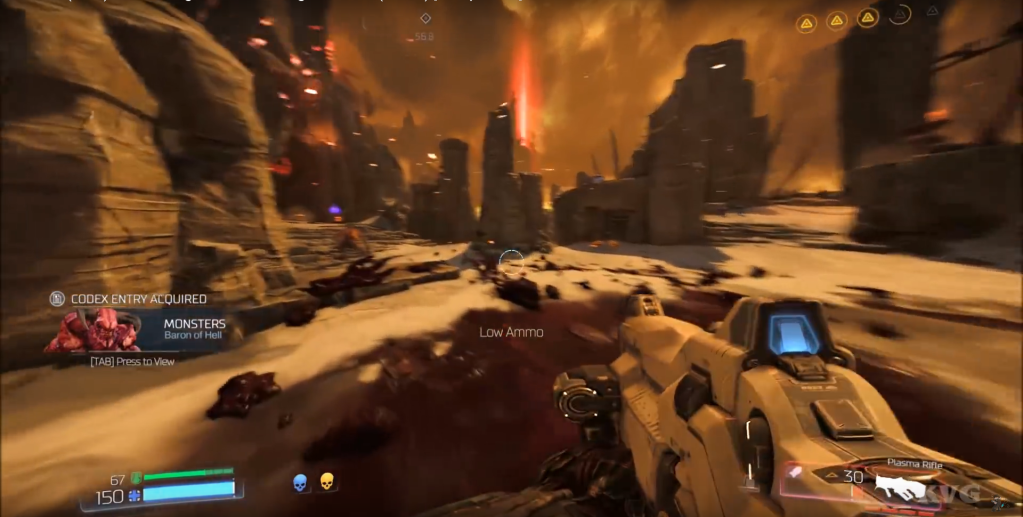
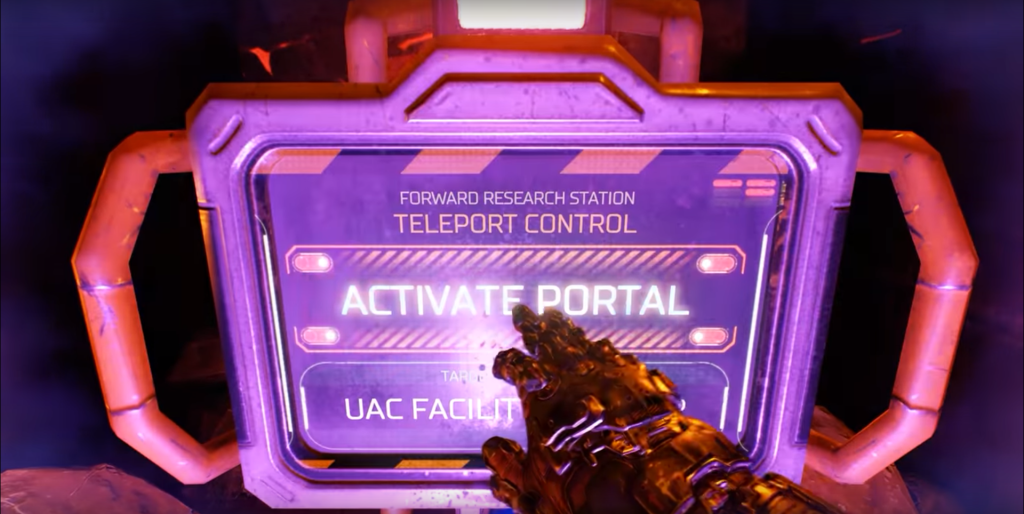
Kadingir Sanctum is the 6th mission in DOOM and the first mission that occurs in Hell. You are sucked into the Hell portal, that which is opened by Olivia Pierce, and so the mission starts you off here. The sole objective is simple in theory, but not in execution, you must fight the onslaught of countless demons/monsters. While playing you will discover 3 new monsters which you must defeat. The Cacodemons, The flying Lost Souls and the Barons of Hell. You must advance through the map, killing each monster in sight, and make it to the Temple, where the portal is, and open it to get back to Mars.
Assets-
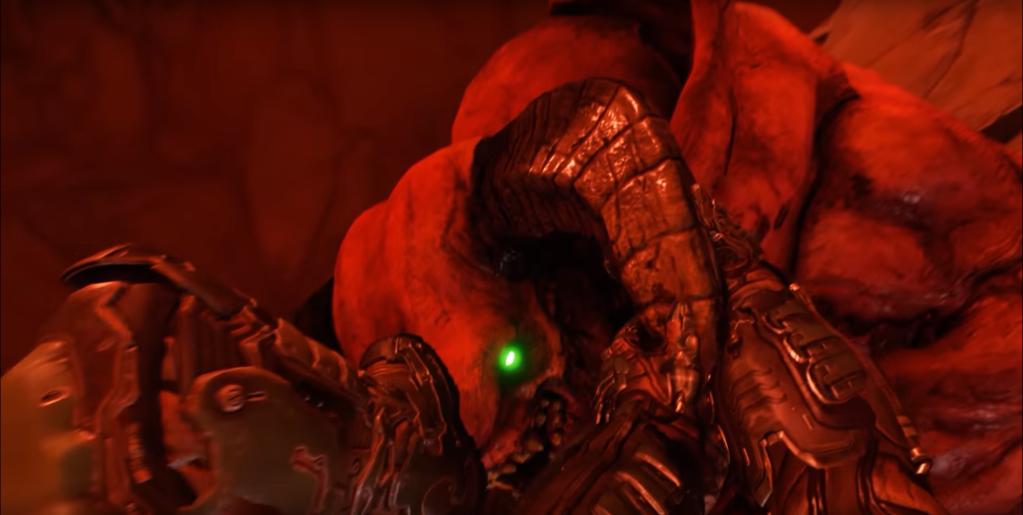
Throughout the level, there is a recurring theme of Gothicism. This is mostly evident in the Architecture that is present in the sanctum itself. It shows a grave sense of age within the level, showing to the player that this place has not been touched by others and that it has aged incredibly well, compared to how long it has been standing there for. Alongside this, the monsters/demons that must be fought, have a look that resembles age alongside turmoil, from their slim structure, to how they fight and which weapons that they use to do so. Whilst there is a hierarchy of monsters, and the recurring pattern is that the larger they are the harder they are to defeat, but each monster that is thrown your way, brings a new sense of strategy to the level, forcing the player to act and counter quickly.
This is the gate to Hell and the start of the mission.
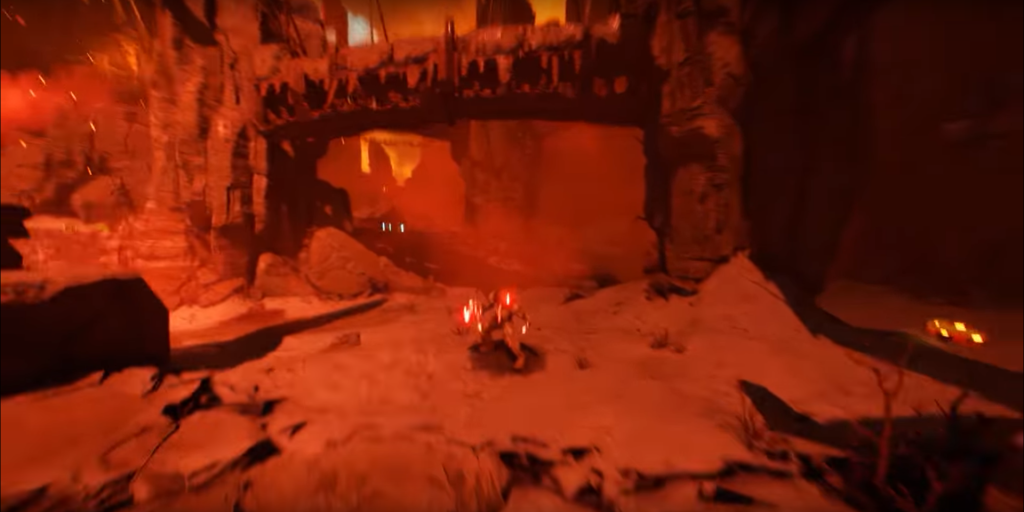
Compared to the scenery, the lighting stays the same whenever the player walks around on top of the level, only when they go inside a cave does the lighting darken. However, the largest change in lighting and aura is when the player is near completing the level, and the final boss fight for the mission has begun. The light becomes a more “blood red” and the sight distance decreases as a fog begins to roll inwards, around the designated fighting area. Although there is more restriction in choosing a path to take in DOOM, the focus of this mission is slaughter enemies and get to safety, compared to reconnaissance, and so the map must be tailored to fit the task. Although this level is only the 6th mission, I would personally gauge that the mission is allowing the player to practice their combat skills, while also developing the story, as it shows the player, where the monsters originate from, and perhaps may show hidden knowledge that could enhance the story later on.
All Pictures shown above are from a YouTube video posted by clockner, which I visited at 2:51pm on 22/09/19. I chose this source, as it offered a complete play through on the hardest difficulty, where no HUD is enabled, which allowed me to capture the essence of the level uninterrupted. Along with this, it is recorded in 4K, which allowed me to capture pictures in exceptional detail.
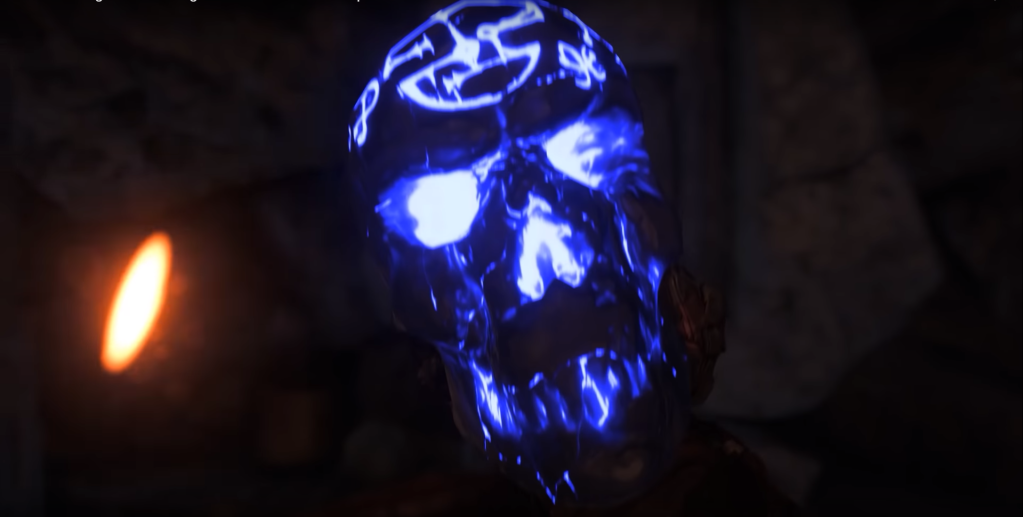
There is very little dialogue, and the only parts that are filled, are those that are activated by the player, where a Demonic voice begins to explain the dawn of this world and how it came to be, with about overall only a minute worth of dialogue, as the reading speed is slow, but impactful. Although if the player walks too far from the alter where the dialogue was activated from, then the voice will become silent, but the text will stay on the screen, until the dialogue has finished.
Although, the OST for the level/mission, was executed perfectly. From the subtle filler music and ambient noises during the exploration to the intense and virtually overwhelming Digitally synthesised progressive metal, that matches the speed of gameplay and overwhelming nature of the monsters that you must slay through.
The use of the many species of monster present, does
inflict additional challenges whilst in combat, as each monster has a different
fighting style, and so the player’s must also be adapted accordingly. Although
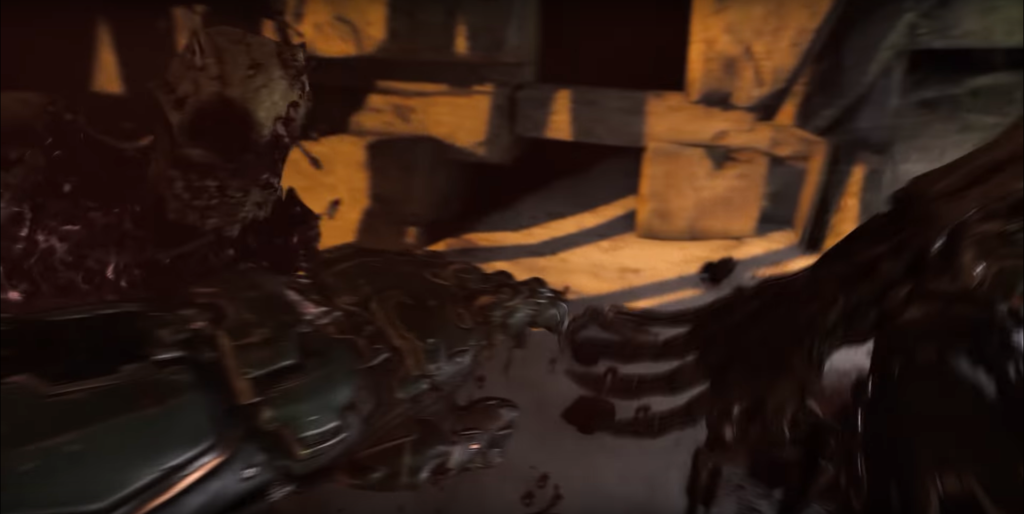
the sounds used in the mission, especially during the melee attack on the
monsters, does sound authentic and that the various animations do sound different
depending on the monster it was inflicted upon, and that it sounds different due
to each monster having different anatomies, and so different animations would
have to be played as a result.
(All pictures regarding text and monster Codex entries are also from a single source. A YouTube video posted by Throneful, which I visited at 2:55pm on 22/09/19. I chose this source, as it was gameplay that offered the player a HUD, so it allowed me to capture pictures of the Codex entries that pop-up during gameplay. These entries do not show on “nightmare mode” so I had to look for gameplay of these entries elsewhere. Along with this, the publisher offered their gameplay in still satisfactory quality, which was 1080p at 60FPS.
Playability/complexity-
In my opinion, the mission/level, felt rather choppy. With intense elements of fighting and then more overly calm patches of gameplay, where coloured skulls had to be found. I do understand that the developers could not constantly shovel hordes of monsters at the player, but I found that in certain instances, like when you needed to obtain the skulls, that the level felt too quiet and I felt like I lost the sensation of being in the pit of Hell itself, but I digress. The level itself, did not appear nor feel too difficult or stressful. The main objective was to locate the temple and escape, so the complexity of the task was not too high, but the placements of health-packs and ammunition was rather scarce. Although increasing the difficulty, would only increase the health of the monsters more and make the heath-packs and ammo even more scarce than before. When it comes to playability and even re-playability, a novice on normal difficulty could clear the mission in a respectable time frame, and not find things overly difficult. Although for re-playability this mission would suffer, as the main objective is to locate the temple and escape, while providing very little story progression. Along with this, if the player enjoyed slaying through numerous monsters, each mission has at least one monster that you need to exterminate, and other levels execute this feature a lot better than mission 6. (Kadingir Sanctum) Although if the player missed out on collecting the 6 “secrets” ( 4 Elite Guards, 1 Field Drone, 1 Argent Cell and 2 Rune Trials, along with the Gauss Cannon, which if it was not collected from the previous mission/level, then it can be found here. Then the re-playability of this level would increase, solely for gaining 100% completion of the entire game itself.
This toy soldier is 1 of 2 that are spread across the mission.
This toy soldier is 2 of 2 that are spread across the mission.
All 10 pictures shown above are all melee animations.
Aesthetics-
Overall, the level achieves its presentation of the depiction of Hell, from the lack of greenery to the dark warm lighting and lack of bright assets. It does show that the level/Hell is perhaps older than time itself and that it is a place that no mortal should enter. The level shows to the player that this is a place that has been undisturbed for countless millennia and this is how it should stay. With the appreciation of beauty however, there is close to none. Due to the scenery being mostly filled with rocks and rotted trees that perhaps stood tall years ago, some players may not find this level pleasing in that regard, but perhaps the amount of monsters/demons that need slaying would change their mind.
Resident Evil 7 (2017)
Banned Footage DLC “21”
Story-
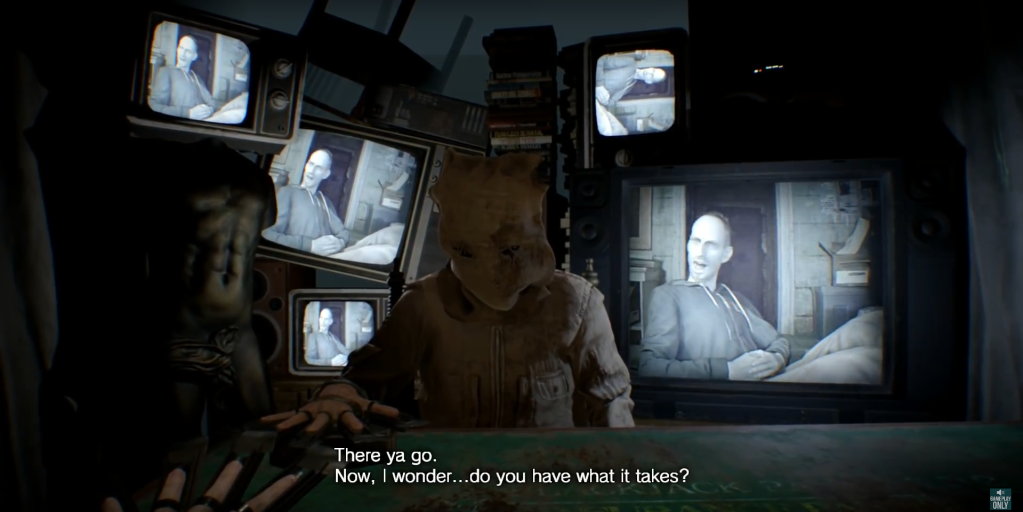
This is the start of the level “21”
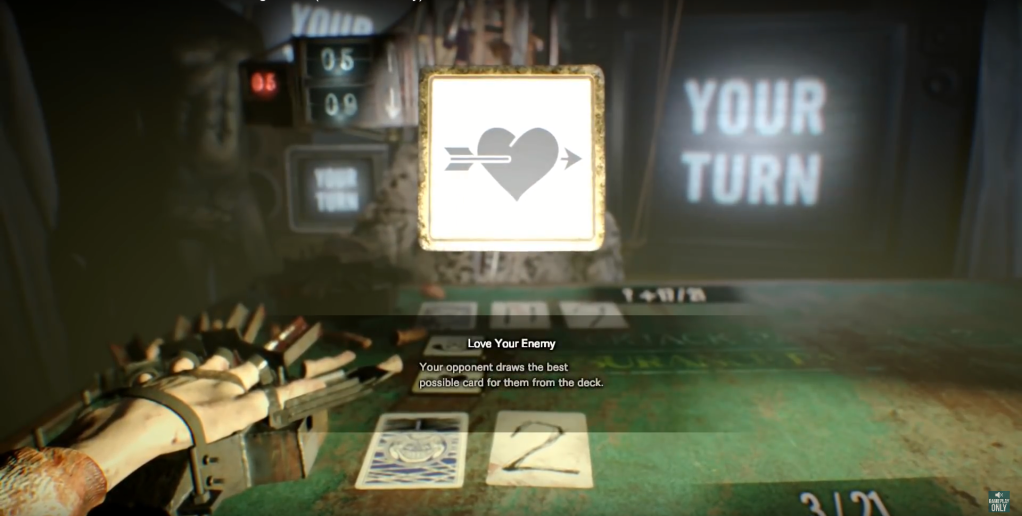
A branched DLC from the story line of RE7, the level “21” is what starts as a simple game of blackjack. But as things start to pick up, the implementation of disturbing consequences and visuals flood the player, as 2 prisoners duel to the death to determine who is worthy of escaping from the basement where they play. Lucas Baker is the mastermind behind this sinister twist on blackjack, after forcefully picking you (Clancy) and somebody else to play his game. Soon after playing, the tides shift, as soon after the level starts, your hand strapped to a device that chops off fingers whenever somebody loses the round of blackjack. Once both of you lose all of your fingers on your strapped hand, the round ends, and once the room brightens again, you see an electrocution device from an old execution chamber that electrocutes both you and the other prisoner. Once the dial reaches 10/Skull, the wearer dies, so it is your job to play with strategy to avoid death. After this stage, your opponent dies, but the sinister Lucas insists that another round is played so nobody can escape, so he uses the body of the prisoner as a puppet to show that “he” wants to play a “Final round”. But this time, a spinning blade is put between the 2 players, to add drama and a sense of the inevitable coming to either you or “Lucas”. But by the skin of your teeth, you make the prisoner (controlled by Lucas) lose and he gets a face full of Mr. Saw. Although once you win, Lucas doesn’t like it, so he simply quits his “show” and leaves you strapped in the chair, as the lights fade for the last time, and the level ends.
Assets-
Although this level only occurs in a single room, the overall sense of danger is always evident, simply due to being in such a small space and not being able to look around that much. The table at which you sit, personally was the factor that attracted my focus the most. As the table already had blood stains on it, before any bodily damage was done to the player or the other prisoner. The use of the 5 old TVs that are in your direct field of view, add to the mystery and the overall aura of horror, that of which I personally think is not replicated as well in any other horror video game on the market, which is why this DLC was placed in the “banned footage” section of the game. Throughout the level, from the point where you are greeted, to when Lucas leaves you in the dark to die, no music is played at any point. This is to encourage the player to solely focus on the game of blackjack, along with trying to mimic maximum realism during the 20 minutes of gameplay. Along with this, the lack of music allows for the player to have their hearing focused on the pleading of your opponent to see his family, along with the sinister sound of Lucas’ voice bellowing from the old TVs stationed in the basement, where you play. All text is presented to the player to ensure that if they are not listening to the speech, then they are reading it, to fully allow the player to fully grasp the context and feeling of being trapped in a death game.
Playability/complexity-
Overall, the complexity of this level is rather high. Due to over 3 rounds of blackjack are played with each round bringing new challenges to the table, as Lucas tries his best to kill both you and the opponent while playing, but you outsmart him with each ace he pulls from his sleeve. The hardest part of the level is knowing what to play and when, so a sense of strategy VS tactics is always lingering. Especially for a person new to blackjack or horror games in general, where tactics and strategy go hand-in-hand with each choice that you must make.
In terms of overall playability, the level only offers a one-time impact on the player. As once the player finishes the level once, then they know what is going to happen if they replay it again. Yet for overall replay ability, the level would only be played again, if the player lost the first time and needed to try again as they need to win in order to progress to the next level/ gain the 100% completion for the game. The whole reason for this level’s existence, I personally think is to offer a new flavour in the horror game industry, showing how gruesome and thrilling horror games can become and that perhaps it would be best for players to reconsider before buying such genre of games, as this can scar some players as it’s so intense and almost life-like for the player to experience such “banned footage” Along with this, the offering of power-ups in the level adds another layer of strategy behind the luck that is offered when playing blackjack, as this lets the player personalise how the rounds play out, whether they play with skill and proceed to “victory” or whether they play wrongly and end up losing to the opponent and dying in the process, only to do the level again.
(All pictures above are gathered from 1 source, a YouTube video posted by GameplayOnly. I visited it at 5:22pm on 22/09/19. I chose this source, as it was a video offered without any commentary nor a face cam, so I was able to fully capture the essence of the level without distractions. Along with this, it was recorded in a high resolution of 1080p along with a high refresh rate of 60FPS, so I could extract detailed images, with little motion blur.)
Aesthetics-
The overall aesthetics of the level is dark and mysterious. From the dark surroundings and retro TVs in your FOV to how the opponent has an old dirty sack on his head. Plus the only source of “warm” light is when it is your turn to play, and besides that the light is from the TVs showing your score compared to the opponent. Even the sense of realism, how the fingers that were chopped off earlier are still on the table untouched, shows a kind of nature only found in a horror game, and that the shear detail placed on the objects such as the fingers and Mr. Saw, adds another sense of realism that perhaps the player can appreciate, as they fight for their life.
Closing comparison
Overall, with each game mentioned above originating from separate genres, AC IV being action-adventure, stealth and action, and how DOOM is a first-person shooter and action, while Resident Evil 7 (RE7) is a contemporary horror game, each game has their respective differences in their level design that make them unique. As RE7 and DOOM are both somewhat gruesome games with gore and blood, both games take separate approaches towards the unknown, such as DOOM ensures that you are a one-man-army, capable of clearing even Hell itself, while RE7 ensures that you the player are a normal person being placed in a helpless situation, where you don’t always escape alive and have a happy ending. However all of these games do have similar traits, such as having strategy for the player to utilise as new challenges arise, and that the player must react to them as well as they can. While AC IV and RE7 do incorporate more story development in the levels analysed, there can be plot twists around every corner, and although DOOM did not show that in mission 6, I can assure you that many come your way in the missions to come. Each game is an extension of the genre as a whole, so it is natural that each level would be set in different locations, and the amount of choice available to the player would change too. While DOOM was more limiting, AC IV offered a more open world experience full of choice and wonder, compared to RE7 where the choice and wonder would come down to the the player playing it, whether they choose to peek behind the curtain or not. But again, all 3 of these levels offered something different to the table in terms of levels and level design, each incorporating something that the other did not, and this is what makes each video game unique, and ensures that the levels made are perfectly tailored for the genre of choice.
This is the first post on my new blog. I’m just getting this new blog going, so stay tuned for more. Subscribe below to get notified when I post new updates.
This is an example post, originally published as part of Blogging University. Enroll in one of our ten programs, and start your blog right.
You’re going to publish a post today. Don’t worry about how your blog looks. Don’t worry if you haven’t given it a name yet, or you’re feeling overwhelmed. Just click the “New Post” button, and tell us why you’re here.
Why do this?
Because it gives new readers context. What are you about? Why should they read your blog?
Because it will help you focus you own ideas about your blog and what you’d like to do with it.
The post can be short or long, a personal intro to your life or a bloggy mission statement, a manifesto for the future or a simple outline of your the types of things you hope to publish.
To help you get started, here are a few questions:
Why are you blogging publicly, rather than keeping a personal journal?
What topics do you think you’ll write about?
Who would you love to connect with via your blog?
If you blog successfully throughout the next year, what would you hope to have accomplished?
You’re not locked into any of this; one of the wonderful things about blogs is how they constantly evolve as we learn, grow, and interact with one another — but it’s good to know where and why you started, and articulating your goals may just give you a few other post ideas.
Can’t think how to get started? Just write the first thing that pops into your head. Anne Lamott, author of a book on writing we love, says that you need to give yourself permission to write a “crappy first draft”. Anne makes a great point — just start writing, and worry about editing it later.
When you’re ready to publish, give your post three to five tags that describe your blog’s focus — writing, photography, fiction, parenting, food, cars, movies, sports, whatever. These tags will help others who care about your topics find you in the Reader. Make sure one of the tags is “zerotohero,” so other new bloggers can find you, too.


